

A way to backup your servers using a s3 bucket
Imagine you are hosting an application, a blog on a cloud provider and you don’t want to pay a extra fee for backup storage.
You already have a local infrastructure and but you don’t already have a s3 storage.
Here I will explain how I deployed a backup architecture for all my servers selfhosted or on cloud.
Source: https://github.com/sinnwerkstatt/runrestic
Deploy Minio
As always, I will use my Synology NAS to host the minio service and use a docker-compose.
At first I just create a new directory (or share if you prefer) to host my minio data
1$ mkdir -p /volume1/docker/minio
Personnaly I use portainer to manage my docker containers as I don’t like the too simple and basic docker app on DSM….
My docker-compose.yml look like this
 1version: '3'
 2services:
 3  minio:
 4    image: quay.io/minio/minio:RELEASE.2023-05-27T05-56-19Z
 5    volumes:
 6      - /volume1/docker/minio:/data
 7    ports:
 8      - 32769:9000
 9      - 32768:9001
10    environment:
11      MINIO_ROOT_USER: 'root'
12      MINIO_ROOT_PASSWORD: 'password'
13      MINIO_ADDRESS: ':9000'
14      MINIO_CONSOLE_ADDRESS: ':9001'
15      VIRTUAL_HOST: 's3.example.com'
16      VIRTUAL_PORT: ':443'
17    command: minio server /data
It may be easier to reverse proxy Minio behind a Nginx or traefik but I won’t cover this for now. I assume that you already did it and your appliance is reachable from restic using s3.example.com.
Create restic bucket
Connect to the minio admin console (let’s say that my server hosting minio is named backup.example.com) using port 9001 : http://backup.example.com:9001
Use the value in MINIO_ROOT_USER and MINIO_ROOT_PASSWORD.
From the Administrator section click on Buckets and then Create Bucket
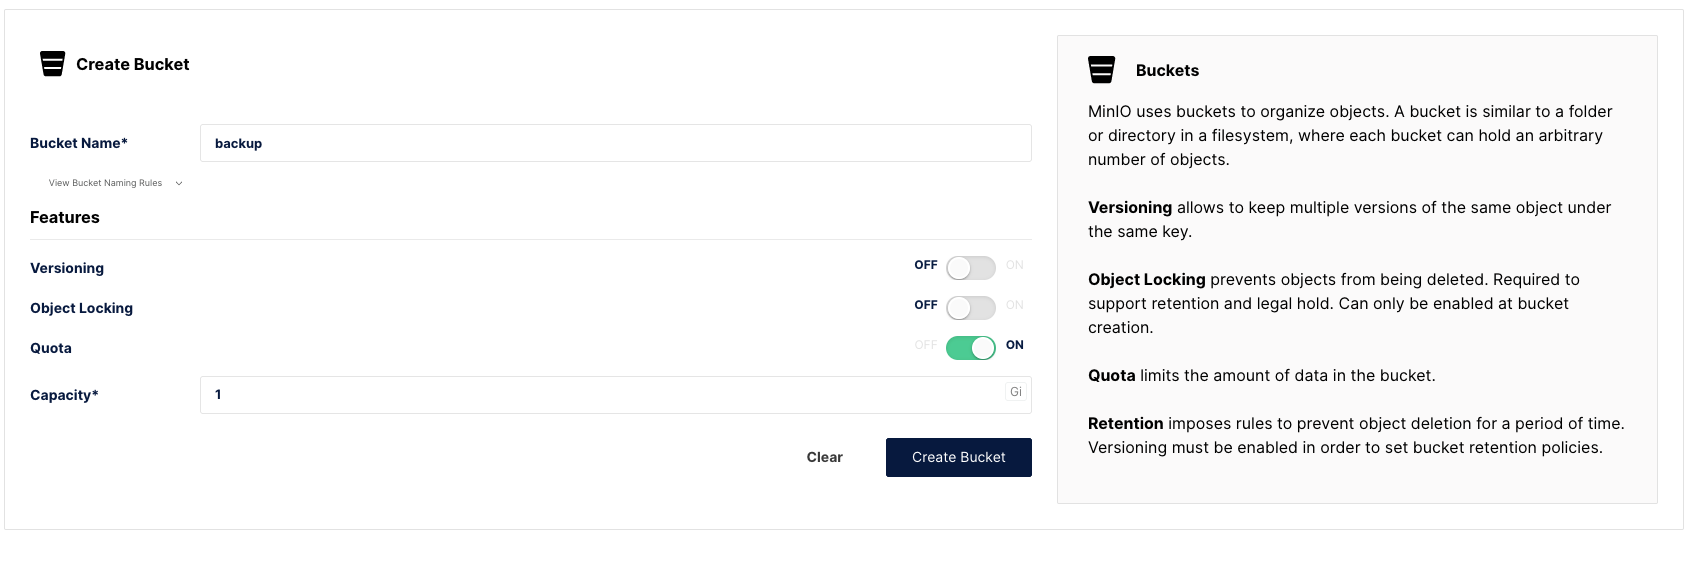 Define a name for your bucket and select the features you want. Here I don’t need file versionning as I will let restic manage as well as for Object locking.
I just define a Quota by security to 1Gb (only for the demo)
Create user and policy
Next thing to do is to create a user able to read and write on the bucket.
We will first create a user, under the Administrator section, click on Identity - Users and Create user:
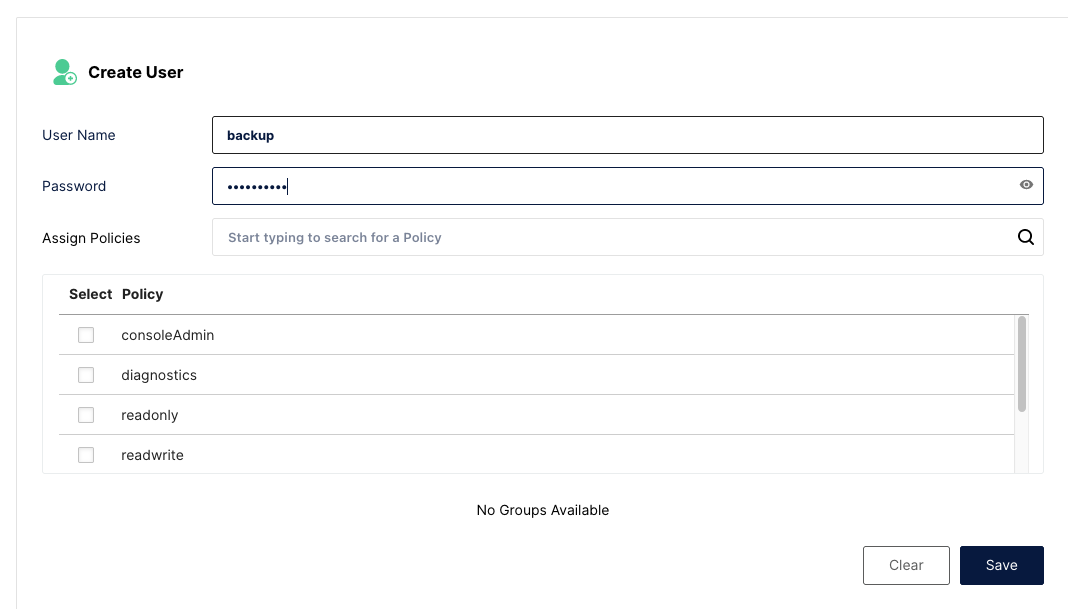
Don’t select any policy for now, we will create a new one !
Under Administrator section, click on Policies then Create Policy
As policies are json based, we will have to paste something like this:
 1{
 2    "Version": "2012-10-17",
 3    "Statement": [
 4        {
 5            "Sid": "BucketAccessForUser",
 6            "Effect": "Allow",
 7            "Action": [
 8                "s3:*"
 9            ],
10            "Resource": [
11                "arn:aws:s3:::backup",
12                "arn:aws:s3:::backup/*"
13            ]
14        }
15    ]
16}
Warning
Note that we allow all method under Action (this mean that the user is admin of the bucket) and we filter under Resource where does this apply. In our case it’s related to the backup bucket.
Next you can edit your previously created user and assign the policy.

Last step is to create a Service account for this user (used by restic). In the Service Accounts tab click on Create Access Key and just click on Create
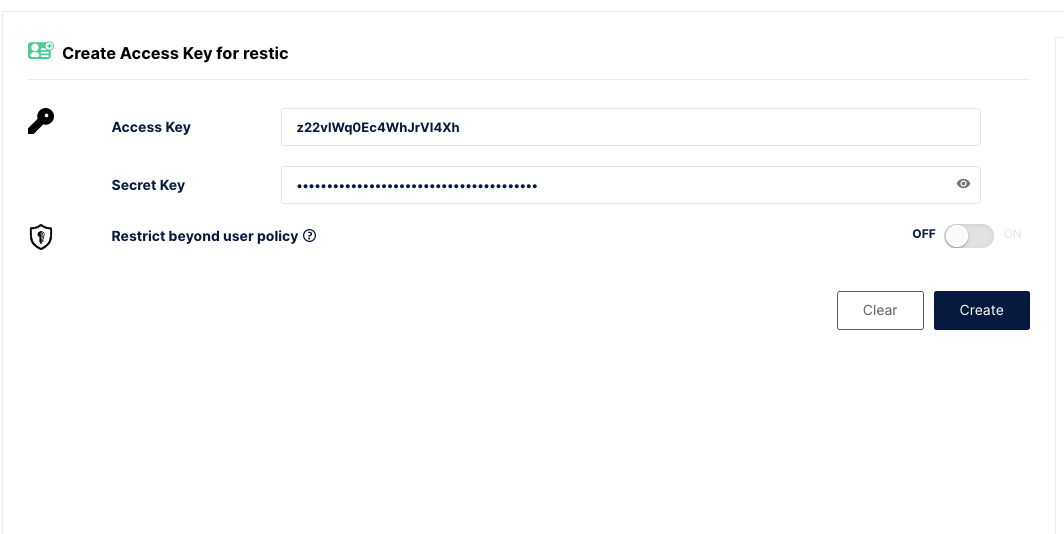 You should be prompted to download a json file containing the access key and secret key.
And you are done with the Minio part !
Configure restic client server
Install the required tools
1$ yum install -y restic python3-pip
2$ pip3 install --upgrade runrestic
Create the runrestic configuration
You will need to adapt this config file in order to fit to your needs:
- repositories : you need to change the fqdn or just put the ipadress and port if it is on the same network
- AWS_ACCESS_KEY_ID : get it from the json file
- AWS_SECRET_ACCESS_KEY : get it from the json file
- RESTIC_PASSWORD : use whatever password generator
 1name = "blog backup" # optional. if not set, the filename will be used without the extension
 2
 3repositories = [
 4    "s3:https://s3.example.com/backup/"
 5    ]
 6
 7[execution]
 8parallel = true
 9retry_count = 10
10retry_backoff = "1:00 exponential"  # 00:00 = min:sec; 00:00:00 = hour:min:sec
11# strategies:
12#  - static (same duration every try)
13#  - linear (duration * retry number)
14#  - exponential
15
16[environment]
17AWS_DEFAULT_REGION="eu-west-1"
18AWS_ACCESS_KEY_ID="xxxxxxxxxxxxxxx"
19AWS_SECRET_ACCESS_KEY="zzzzzzzzzzzzzzzzzzzzzzzzzzzzzz"
20RESTIC_PASSWORD="qqqqqqqqqqqqqqqqqqqqqq"
21
22# or RESTIC_PASSWORD_FILE
23# https://restic.readthedocs.io/en/latest/040_backup.html#environment-variables
24
25[backup]
26sources = [
27    "/opt/"
28    ]
29
30exclude_patterns = []
31# exclude_files = []
32# exclude_if_present = []
33
34pre_hooks = ["systemctl stop myapp"]
35post_hooks = ["systemctl start myapp"]
36
37[prune]
38keep-last =  3
39keep-hourly =  5
40keep-weekly = 10
41keep-monthly = 30
42group-by = "host,paths"
43# https://restic.readthedocs.io/en/latest/060_forget.html#removing-snapshots-according-to-a-policy
44
45[check]
46checks = ["check-unused", "read-data"]
Initialize restic repository
The first time you deploy restic, you will need to initialize the repository on the s3 bucket (this has to be done just once for all your servers)
1/usr/local/bin/runrestic init
If everything goes well you should have a some directories and files created Run your first backup
Just simply run without any arguments
1/usr/local/bin/runrestic
Schedule using systemd timers
Create a systemd file in /etc/systemd/system/runrestic.service
1[Unit]
2Description=runrestic backup
3
4[Service]
5Type=oneshot
6ExecStart=/usr/local/bin/runrestic
And create a timer service
1[Unit]
2Description=Run runrestic backup
3
4[Timer]
5OnCalendar=daily
6Persistent=true
7
8[Install]
9WantedBy=timers.target
Enable systemd configuration
1systemctl enable runrestic.timer
2systemctl start runrestic.timer
And you are done !
Going further
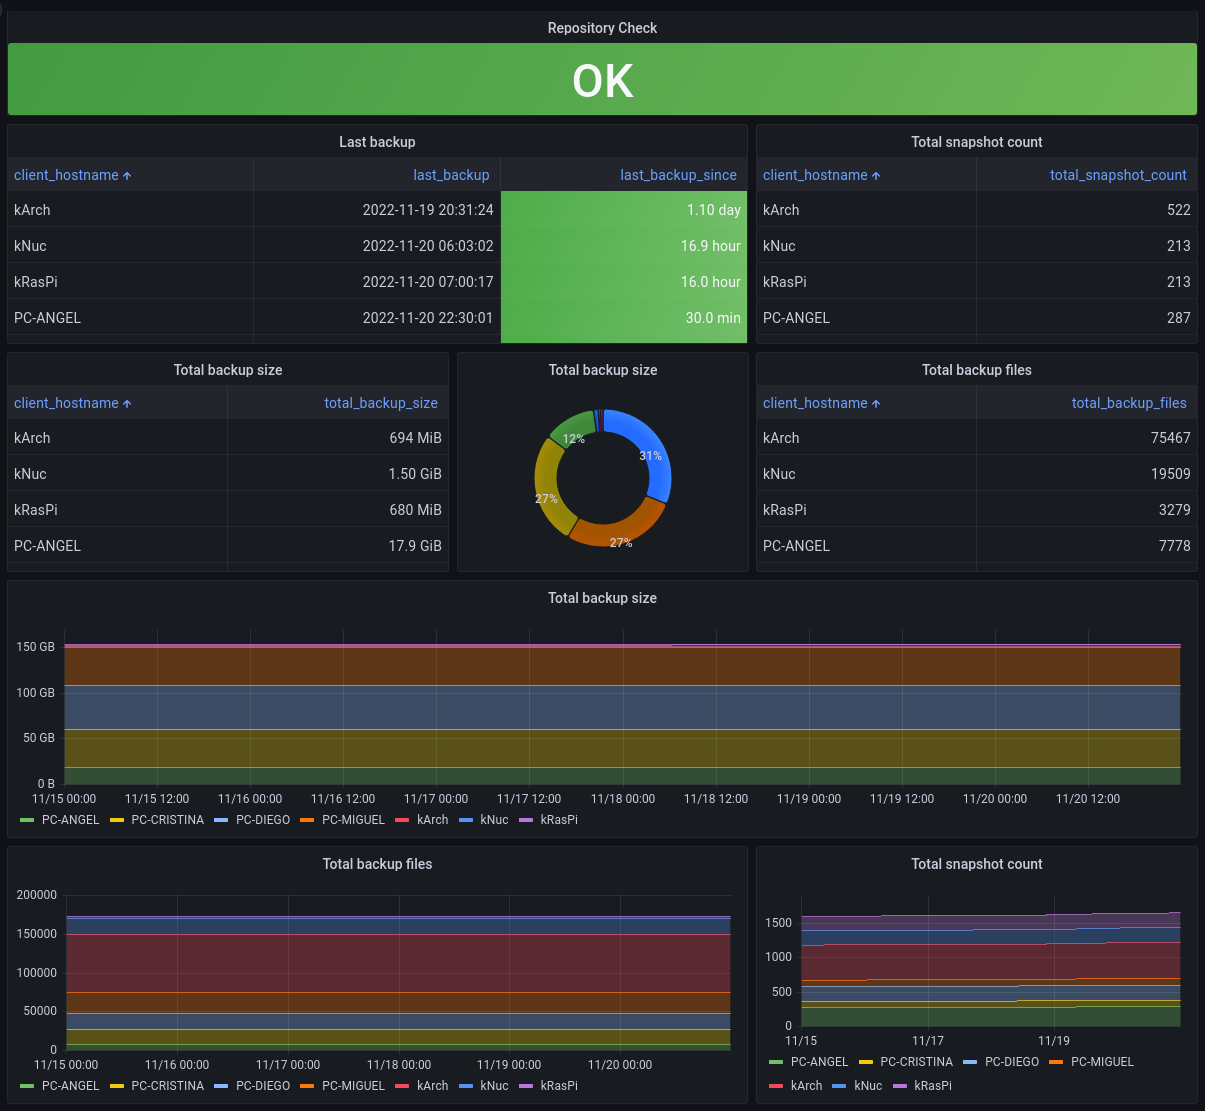
If you want to get a dashboard of your backup jobs, you can deploy a prometheus restic exporter : https://github.com/ngosang/restic-exporter
Of course you will need a prometheus instance and a grafana instance to display the dashboard
You might also like
 linux
linuxUse vaultwarden as password store in Gnome
Vaultwarden is a great solution to self-host your passwords, it’s compatible withe the Bitwarden client but …
linuxUbuntu, TPM2 and disk encryption
Use the tpm2 chip to decrypt your disk at startup without entering your passphrase.